
Eve implements agents as a collection of capabilities. Please refer to the Agent section for an overview how these capabilities can form agents.
This section provides an overview of the available capabilities, and their purpose:
All capabilities follow the same usage pattern, implementing the same interface. Obtaining a specific instance of a capability is done through a builder pattern. This is a three step process:
All capabilities accept a Jackson JSON DOM node as configuration.This allows very flexible configuration and allows the agent to serialize its configuration. It also allows the configuration to be obtained from file in various file formats (JSON, Yaml, etc.) For most capabilities there is a one-on-one mapping from JSON config to specific capability instance. This means if you build a capability with exactly the same configuration, you most probably get the same capability instance again.
For most capabilities there is a specific config class, extending Jackson’s JSONNode, which you can use to programatically set the various configuration fields. (=bean-like interface)
Several capabilities need to be able to invoke a callback method on the agent. For example, an incoming message needs to be able to invoke a receive method in the agent. The capability model provides the possibility to provide such a callback method to the capability. This callback is wrapped in a handler object, to allow the agent to be suspended. (see lifecycle for more information about suspension) Depending on the capability category, the callback method needs to implement a specific interface. (e.g. Receiver for Transports)
All capabilities have their own builder. This allows compile-time selection of the capability. But for full data driven setups, in which it’s not yet known which capability will be used during runtime, it is possible to use the generic CapabilityBuilder. This builder uses a “class” field in the configuration to dynamically select the needed capability.
Eve agents can communicate via various transports. Eve currently has four built-in transport protocol implementations: Http, Websockets, Xmpp and ZeroMQ.
A single Eve agent can have multiple Transports configured, each with its own URL structure. This allows exposure of the agents via multiple transports at the same time. This also means each agent has multiple addresses as well.
All transport capabilities share two configuration items:
doShortcut: This option controls if the capability may bypass the network layer if it detects that the receiver of a message is actually hosted in the same VM. If this options is true, the message may be passed directly to the receiver, if false, the message is fully send through the network layer, included potential serializations, etc.
doAuthentication: This option controls if the transport capability is responsible for fully determine the authentication of the remote endpoint on incoming messages. If true, the capability will enforce access authentication. (Within the HTTP transport this enforces SSL and basic authentication) If false, the capability will just accept the remote endpoints claimed senderUrl and use that as sender address.
The agent needs to initialise the HttpCapability through the HttpTransportBuilder. This capability acts like an adapter to a servlet which implements the HTTP endpoint. This servlet needs to be setup separately from the HttpCapability, although in the embedded setup this is done in one configuration action.
Eve comes with a servlet EveServlet which exposes agents via a standard Java servlet. A specific agent can be addressed via this servlet by specifying its id in the servlet url in a RESTFull manner: <baseUrl>/<id>, e.g. “http://example.com/agents/myAgentId”.
There are two ways to setup the servlet environment:
//Setup the configuration:
final HttpTransportConfig config = new HttpTransportConfig();
config.setServletUrl("http://localhost:8080/agents/");
config.setId("testAgent");

//Build the transport:
final Transport transport = new TransportBuilder()
   .withConfig(config)
   .withHandle(new SimpleHandler<Receiver>(new Receiver(){
      public void receive(final Object msg, final URI senderUrl,final String tag) {
         System.out.println("Received msg:'" + msg + "' from: " + senderUrl.toASCIIString());
      }
   }))
.build();This configuration is very similar to the above setup, except that some more configuration is added to configure the servlet. This setup requires that the embedded Jetty is bundled
//Setup the configuration:
final HttpTransportConfig config = new HttpTransportConfig();
config.setServletUrl("http://localhost:8080/agents/");
config.setId("testAgent");

//Add a servlet launcher to the http config:
config.setServletLauncher("JettyLauncher");

//Add Jetty specific configuration to the http config:
final ObjectNode jettyParms = JOM.createObjectNode();
jettyParms.put("port", 8080);
config.put("jetty", jettyParms);

//Build the transport:
final Transport transport = new TransportBuilder()
   .withConfig(config)
   .withHandle(new SimpleHandler<Receiver>(new Receiver(){
      public void receive(final Object msg, final URI senderUrl,final String tag) {
         System.out.println("Received msg:'" + msg + "' from: " + senderUrl.toASCIIString());
      }
   }))
   .build();
The equivalent JSON configuration is:
{
   "class":"com.almende.eve.transport.http.HttpTransportBuilder",
   "servletUrl":"http://localhost:8080/agents/",
   "id":"testAgent",
   "servletLauncher":"JettyLauncher",
   "doShortcut":true,
   "doAuthentication":true,
   "jetty":{
      "port":8080,
   }
}When running Eve in an external servlet environment like in Jetty or Tomcat, the servlet needs to be configured in the web.xml:
To configure the servlet add the following lines to the web.xml file of the Java project, inside the <web-app> tag:
<servlet>
   <servlet-name>war</servlet-name>
   <servlet-class>com.almende.eve.transport.http.EveServlet</servlet-class>
   <init-param>
      <param-name>ServletUrl</param-name>
      <param-value>http://localhost:8080/war/agents/</param-value>
   </init-param>
   <load-on-startup>1</load-on-startup>
</servlet>

<servlet-mapping>
   <servlet-name>war</servlet-name>
   <url-pattern>/agents/*</url-pattern>
</servlet-mapping>
The url-pattern in the servlet mapping can be freely chosen (in the example
chosen as /agents/*). This determines the url at which the servlet is running.
It is important to end the url with the pattern /*,
as the url of the servlet will end with the id of the agent. Together with the hostname of the server, this url-pattern forms the servlet base URL, which needs to be provided to the servlet, through the ServletUrl init parameter. This parameter is used by the servlet to lookup the HttpTransportCapabilities of the configured agents.
It is therefor important that the ServletUrl parameter is equal to the ServletUrl parameter in the HttpTransportConfig instance that is given to the HttpTransportBuilder.
Besides the EveServlet, there is also a debug servlet available, which exposes a simpel debugging GUI when GET-ing the agent url. This debug servlet is implemented in class: com.almende.eve.transport.http.DebugServlet. Just replace EveServlet with DebugServlet in the above mentioned configuration.
The websocket transport is somewhat different from the other transports, in the sense that it can only be used to exchange data with a specific other agent. It is not a generic routing transport, like XMPP or HTTP, but limits traffic to a single remote agent.
To use websockets, the two agents need to implement a side of the client-server relationship. After initialisation, this directional choice doesn’t further limit traffic.
final WebsocketTransportConfig clientConfig = new WebsocketTransportConfig();
clientConfig.setId("testClient");
clientConfig.setServerUrl("ws://localhost:8082/ws/testServer");

/* default value, this can be omitted */
clientConfig.setServer(false);

final Transport client = new TransportBuilder()
   .withConfig(clientConfig)
   .withHandle(new SimpleHandler<Receiver>(new Receiver(){
      public void receive(final Object msg, final URI senderUrl,final String tag) {
         System.out.println("Received msg:'" + msg + "' from: " + senderUrl.toASCIIString());
      }
   }))
   .build();
client.connect();

client.send(URI.create("ws://localhost:8082/ws/testServer"),
            "Good day to you!", null);
As stated, the client connection only supports sending data to the server endpoint, as shown in the above example.
The equivalent JSON configuration is:
{
   "class":"com.almende.eve.transport.ws.WebsocketTransportBuilder",
   "server":false,
   "id": "testClient",
   "serverUrl": "ws://localhost:8082/ws/testServer"
}final WebsocketTransportConfig serverConfig = new WebsocketTransportConfig();
serverConfig.setAddress("ws://localhost:8082/ws/testServer");
serverConfig.setServer(true);
serverConfig.setServletLauncher("JettyLauncher");
final ObjectNode jettyParms = JOM.createObjectNode();
jettyParms.put("port", 8082);
serverConfig.put("jetty", jettyParms);
final Transport server = new TransportBuilder()
.withConfig(serverConfig)
.withHandle(new SimpleHandler<Receiver>(new Receiver(){
public void receive(final Object msg, final URI senderUrl,final String tag) {
System.out.println("Received msg:'" + msg + "' from: " + senderUrl.toASCIIString());
}
}))
.build();
server.send(URI.create("wsclient:testClient"), "Hi there!", null);As shown, the connected clients are addressable through “wsclient:<clientId>”.
The equivalent JSON configuration is:
{
   "class":"com.almende.eve.transport.ws.WebsocketTransportBuilder",
   "server":true,
   "address":"ws://localhost:8082/ws/testServer",
   "servletLauncher":"JettyLauncher",
   "jetty":{
      "port":8082
   }
}Agents can be connected individually to an XMPP server through the Xmpp transport capability. Each agent can be addressed through the given JabberID. (e.g. xmpp:agent@example.com/endpoint)
final XmppTransportConfig config = new XmppTransportConfig();
params.setAddress("xmpp://alice@example.com/example");
params.setPassword("wonderland");

final Transport transport =   new XmppTransportBuilder()
   .withConfig(config)
   .withHandle(new SimpleHandler<Receiver>(new Receiver(){
      public void receive(final Object msg, final URI senderUrl,final String tag) {
         System.out.println("Received msg:'" + msg + "' from: " + senderUrl.toASCIIString());
      }
   }))
   .build();

//Connect to the server
transport.connect();

//Send some data to the other end
transport.send(URI.create("xmpp:bob@example.com"),"Hello World", null);


//Disconnect again if required
transport.disconnect();
The equivalent JSON configuration is:
{
   "class":"com.almende.eve.transport.xmpp.XmppTransportBuilder",
   "address":"xmpp://alice@example.com/example",
   "password":"wonderland",
   "doShortcut":true,
   "doAuthentication":true
}Agents can also be provided with ZeroMQ sockets. Eve supports all three types of ZeroMQ addresses: TCP sockets, IPC sockets and inproc sockets. When the agentHost is configured for ZeroMQ, each agent is provided with an inbound PULL socket at the configured address. Each outbound call will instantiate a PUSH socket which pairs with the remote PULL socket.
//Setup configuration:
final ZmqTransportConfig config = new ZmqTransportConfig();
config.setAddress("zmq://tcp://127.0.0.1:5678");

//Build transport
final Transport transport = new TransportBuilder()
   .withConfig(config)
   .withHandle(new SimpleHandler<Receiver>(new Receiver(){
      public void receive(final Object msg, final URI senderUrl,final String tag) {
         System.out.println("Received msg:'" + msg + "' from: " + senderUrl.toASCIIString());
      }
   }))
   .build();

//Setup listening sockets:
transport.connect();

//Send some data to the other end
transport.send(URI.create("zmq://tcp://127.0.0.1:5678"), "Hello World",
   null);
The equivalent JSON configuration is:
{
   "class":"com.almende.eve.transport.zmq.ZmqTransportBuilder",
   "address":"zmq://tcp://127.0.0.1:5678",
   "doShortcut":true,
   "doAuthentication":true
}
With the above mentioned configuration each agent will get a ZMQ socket assigned with the following address: tcp://127.0.0.1:5678. The ZMQ transport supports all three ZMQ address types:
For routing to these addresses from within an agent a zmq: prefix needs to be added (as reported through agent.getUrls()). (e.g. zmq:ipc:///tmp/zmq-socket-testAgent1)
In the agent implementations, described in the Agent section, the message transformations are normally hidden behind a simplified API. These transformations are implemented as capability. Currently only the RPC handling is available as protocol, but in the near future other protocol conversions will be provided. This can include things like compression, encryption, specialized envelops, etc.
final JSONRpcProtocolConfig config = new JSONRpcProtocolConfig();
config.setCallbackTimeout(20);

final JSONRpcProtocol protocol = new JSONRpcProtocolBuilder()
   .withConfig(config)
   .withHandle(
      new SimpleHandler<Object>(new MyClass()))
   .build();

final AsyncCallback<Boolean> callback = new AsyncCallback<Boolean>() {

   @Override
   public void onSuccess(final Boolean result) {
      LOG.warning("Success!");
      assertTrue(result);
   }

   @Override
   public void onFailure(final Exception exception) {
      LOG.log(Level.WARNING, "Fail:", exception);
      fail();
   }
};

final Params parms = new Params();
parms.add("parm", true);

// Outbound traffic:
Object request = new JSONRequest("testMe", parms, callback);

 // Inbound traffic:
Object response = protocol.invoke(request,
		URI.create("local://me"));
For outbound traffic the RPC transform is used to create the RPC request. The RPC transform also keeps state for these request, if a callback method is provided. This callback will be kept in memory for a configurable timeout period. (default is 30 seconds)
For inbound traffic, the RPC transform ‘invoke’ method will first determine if this is a reply on an earlier outbound request. If it is, it will obtain the callback and call it’s methods. If this is an inbound request, the RPC transform will prepare and invoke a method call on the object that is given as handler to the builder.
Through the State abstraction, agents are offered the capability for easy storage of data per agent. Currently the State is modeled as a simple key/value store. Various implementations are offered, with different storage attributes:
State acts similar to a Java collections Map<String,Object>, but with a few distinct differences. The biggest difference if that the state can be serialized to JSON (for persistency) which potentially loses type information on the value. This means that the methods for getting the value need to reinject this type information.
There is a normal put(key,value) method for placing data in the state, overwriting potential existing values. Similarly there are normal remove(key) and containsKey(key) methods. However, other methods are not provided, most notably entrySet() and values().
As mentioned, the getter methods need to reinject the missing type information, as can be seen in the get(key, type) methods:
<T> T get(String key, JavaType type);
<T> T get(String key, TypeUtil<T> type);
<T> T get(TypedKey<T> key);
<T> T get(String key, Class<T> type);
<T> T get(String key, Type type);
These 5 methods each given a different way for putting type information back into the object. These methods actually reflect the same set of options that the JSON-RPC library also offers on it’s call() methods. For JSON based State storage (FileState, CouchDB state, etc.) the first three are more efficient than the latter two. This is because in those cases Jackson doesn’t need to reflect on the Java classes themselves, which is a relative slow operation.
Eve agents can use various approaches to scalability, including running multiple threads for the same agent concurrently. The agent’s state must therefor act as a synchronization point for these threads. Within Java there are various strategies you can take to handle concurrent State access. But especially if certain agent threads run in a different VM/Server (e.g. loadbalanced HTTP setup) it becomes problematic to use standard Java synchronization tools. For this problem, the state offers some distinct tooling for concurrency handling, based on optimistic locking. This is based on the atomic putIfUnchanged() method:
boolean putIfUnchanged(String key, Object newVal, Object oldVal);This method is normally used in the following manner:
public void incr(key){
   int oldval = myState.get(key, Integer.class);
   int newval = oldval + 1;
   if (!myState.putIfUnchanged(key, newval, oldval)){
      //recursive retry: (You might want to limit this recursion with some counter)
      incr(key);
   }
}
Basically you get the current value, make a copy which you modify. Next step you store the value again, but with a check that no other thread has just modified the same value, in which case you just retry the operation.
For each type of State, you’ll find a small code sample below:
final MemoryStateConfig params = new MemoryStateConfig();
params.setId("TestAgent");

State myState = new StateBuilder()
   .withConfig(params)
   .build();

myState.put("msg", "Hi There!");
String result = myState.get("msg", String.class);final FileStateConfig params = new FileStateConfig();
params.setId("TestAgent");
/* Some defaults: */
params.setJSON(true);
params.setPath(".eveagents");
State myState = new StateBuilder()
.withConfig(params)
.build();
myState.put("msg", "Hi There!");
String result = myState.get("msg", String.class);final FileStateConfig params = new FileStateConfig();
params.setId("TestAgent");
params.setJSON(false);
/* default value, therefor optional: */
params.setPath(".eveagents");
State myState = new StateBuilder()
.withConfig(params)
.build();
myState.put("msg", "Hi There!");
String result = myState.get("msg", String.class);final CouchStateConfig params = new CouchStateConfig();
params.setId("TestAgent");
params.setUrl("http://localhost:5984");
params.setUsername("myCouchDBUser");
params.setPassword("myCouchDBPassword");
/* default value, therefor optional: */
params.setDatabase("eve");
State myState = new StateBuilder()
.withConfig(params)
.build();
myState.put("msg", "Hi There!");
String result = myState.get("msg", String.class);final MongoStateConfig params = new MongoStateConfig();
params.setId("TestAgent");
/* default values, therefor optional: */
params.setHost("localhost");
params.setPort(27017);
params.setDatabase("eve");
params.setCollection("agents");
State myState = new StateBuilder()
.withConfig(params)
.build();
myState.put("msg", "Hi There!");
String result = myState.get("msg", String.class);final RedisStateConfig params = new RedisStateConfig();
params.setId("TestAgent");
/* default values, therefor optional: */
params.setHost("localhost");
params.setDbId(0);
State myState = new StateBuilder()
.withConfig(params)
.build();
myState.put("msg", "Hi There!");
String result = myState.get("msg", String.class);To facilitate the autonomous behavior of the software agents, Eve offers various scheduling capabilities. These capabilities act like trigger generators, offering delayed, interval driven message delivery. These messages can contain RPC, allowing the scheduler to be used as an asynchronous taskrunner as well.
final SimpleSchedulerConfig params = new SimpleSchedulerConfig();
params.setSenderUrl("local:scheduler");

final Scheduler test = new SchedulerBuilder()
   .withConfig(params)
   .withHandle(new SimpleHandler<Receiver>(new Receiver(){
      public void receive(final Object msg, final URI senderUrl,final String tag) {
         System.out.println("Received msg:'" + msg + "' from: " + senderUrl.toASCIIString());
      }
   }))
   .build();

test.schedule("Hi there!", DateTime.now());
test.schedule("Hi there!", DateTime.now().plusSeconds(10));
The equivalent JSON configuration is:
{
   "class":"com.almende.eve.scheduling.PersistentSchedulerBuilder",
   "senderUrl":"local:scheduler",
}The biggest difference between the SimpleScheduler and the PersistentScheduler is the addition of a State for storing the task queue of the scheduler.
final PersistentSchedulerConfig params = new PersistentSchedulerConfig();
final FileStateConfig state = new FileStateConfig();
state.put("class", FileStateBuilder.class.getName());
state.put("path", ".eveagents_schedulingtest");
state.put("id", "testScheduling");

params.setState(state);
params.setSenderUrl("local:scheduler");

final Scheduler test = new SchedulerBuilder()
   .withConfig(params)
   .withHandle(new SimpleHandler<Receiver>(new Receiver(){
      public void receive(final Object msg, final URI senderUrl,final String tag) {
         System.out.println("Received msg:'" + msg + "' from: " + senderUrl.toASCIIString());
      }
   }))
   .build();

test.schedule("Hi there!", DateTime.now());
test.schedule("Hi there!", DateTime.now().plusSeconds(10));
The equivalent JSON configuration is:
{
   "class":"com.almende.eve.scheduling.PersistentSchedulerBuilder",
   "senderUrl":"local:scheduler",
   "state":{
      "class":"com.almende.eve.state.FileStateBuilder",
      "path":".eveagents_schedulingtest",
      "json":true,
      "id":"testScheduling"
   }
}Although an agent approach (with its highly autonomous agents) is very effective for modeling various real-life applications, some operations become harder. Especially global, aggregation type of management and situation awareness can be harder to achieve. For this purpose various distributed algorithms exist. Eve tries to provide a suite of library classes to support such algorithms, partly in the form of capabilities and partly as standalone libraries.
Currently there are two mature algorithms available and one prototypical implementation:
Trickle is a protocol, originally meant for lossy wireless networks that need to Gossip about shared data. It features an exponential interval back-off behavior. As soon as some data is changed, it has short sending intervals, but after no changes have been found, it will exponentially lengthen the update interval. Although the inter-agent communication of Eve is not necessarily lossy, the resource optimization is usefull non-the-less.
The Eve trickle implementation provides a class (Trickle.java) that manages the exponential backoff behavior. To allow easy use of this class in a software agent, an RPC endpoint (TrickleRPC.java) is provided as well.
@Access(AccessType.PUBLIC)
class TrickleAgent extends Agent {
	private TrickleRPC	trickle		= null;
	private String 		data              = "Some string";

	@Override
 	public void onInit(){
		//TrickleRPC takes two callbacks: onInterval and onSend
		trickle = new TrickleRPC(config, getScheduler(), new Runnable() {
			@Override
			public void run() {
				//On every new interval
			}
		}, new Runnable() {
			@Override
			public void run() {
				//on every "send" interval
				final Params params = new Params();
				params.add("data", data);
				for (final URI agent : neighbors) {
					try {
						call(agent, "receiveData", params);
					} catch (IOException e) {}
				}
			}
		});
	}

	/**
	 * Gets the trickle RPC (will get namespace "trickle.X")
	 *
	 * @return the trickle
	 */
	@Namespace("*")
	public TrickleRPC getTrickle() {
		return trickle;
	}

	public void receiveData(@Name("data") String data){
		if (this.data.equals(data)){
			//No change, signal trickle to slow down.
			trickle.incr();
		} else  {
			//Data is different, tell trickle to speed up.
			this.data=data;
			trickle.reset();
		}
	}
}
This example is somewhat academic, because no effort is taken to determine which data is newer and/or better, allowing the agents to randomly ignore data or even keep toggling between various values.
TODO!
This section describes capabilities (currently only one) that support agent instantiation and booting.
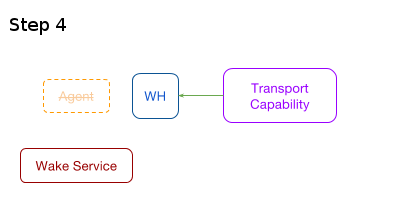
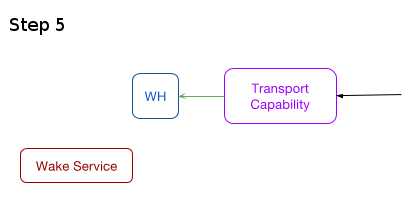
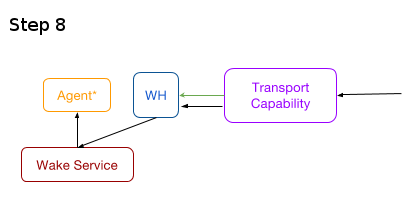
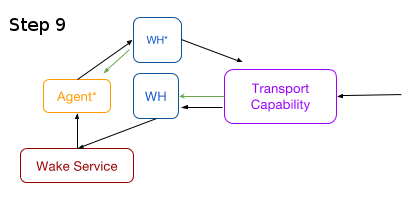
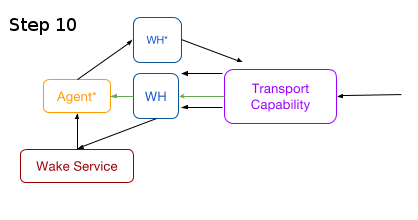
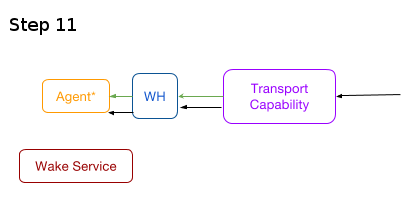
Eve allows its agents to be unloaded from memory and be re-instantiated (woken) when there are incoming messages through the transports and/or schedulers. This is achieved through a combination of a registry and a callback handler.
Workflow of unloading/waking agents: (Click to see a graphical description)
The HibernationHandler is a callback handler which can be used as a parameter for the other capabilities. This handler contains a weakRef to the target object, allowing the target to be unloaded. When an incoming message issues a request for this target object, the HibernationHandler will check the weakRef. If the target has been unloaded, it will use the included key to trigger an initiation action from the instantiationService.
This is a registry (optional persistent for booting support) containing a list of classnames, indexed by a wakeKey. If a specific key is given, it will instantiate the class (in its value) and call the init() method on the instance. This method can be used to recollect the other capabilities, (updating the handler in the process) after which these capabilities can further deliver the message that triggered the instantiation.
final AgentConfig config = new AgentConfig("testWakeAgent");

//First we need to configure the InstantiationService:
final InstantiationServiceConfig isConfig = new InstantiationServiceConfig();
final FileStateConfig stateconfig = new FileStateConfig();
stateconfig.setPath(".wakeservices");
stateconfig.setId("testWakeService");
isConfig.setState(stateconfig);
config.setInstantiationService(isConfig);

//Next we add a normal transport configuration:
final HttpTransportConfig transConfig = new HttpTransportConfig();
transConfig.setServletUrl("http://localhost:8080/agents/");
transConfig.setServletLauncher("JettyLauncher");
transConfig.setServletClass(DebugServlet.class.getName());
final ObjectNode jettyParms = JOM.createObjectNode();
jettyParms.put("port", 8080);
transConfig.set("jetty", jettyParms);
config.setTransport(transConfig);

// Now create an Agent (MyAgent class is annotated by the CanHibernate annotation)
Agent myagent = new MyAgent(config);